
The Complete Roof Inspection Checklist: What Professionals Actually Examine
Your roof protects everything underneath it, but most homeowners have no idea what a professional actually looks for during a roof inspection. After completing more than 75,000 inspections across Southern California and Montana, our team at Cert-A-Roof® has refined our process into a systematic roof inspection checklist that catches problems other inspectors miss.
Need a certified roof inspection? Request an appointment with Cert-A-Roof or call 888-766-3800 for an NRCIA-certified roof evaluation.
This is not a general overview of what roof inspections are (for that, see our residential roof inspection guide). This article is the detailed, item-by-item checklist that certified inspectors actually work through during an evaluation. Use it to understand exactly what gets checked, why each item matters, and what you can monitor between professional visits.
Key Takeaways
- A thorough roof inspection checklist covers six critical zones: roofing materials, flashing, drainage, ventilation, structural elements, and the attic interior.
- Professional inspectors typically spend 45 to 90 minutes on a complete roof evaluation, depending on roof size and complexity.
- NRCIA-certified inspectors follow standardized protocols that general contractors and home inspectors do not, resulting in more accurate and documented findings.
- Scheduling a professional inspection twice per year (spring and fall) and after any major storm can extend your roof’s lifespan by 5 to 10 years.
- A printable checklist helps homeowners track visible issues between professional visits, but it does not replace a certified inspection.
What Is a Roof Inspection Checklist?
A roof inspection checklist is a structured document that guides a professional inspector through every component of a roofing system. It ensures nothing gets overlooked during the evaluation process.
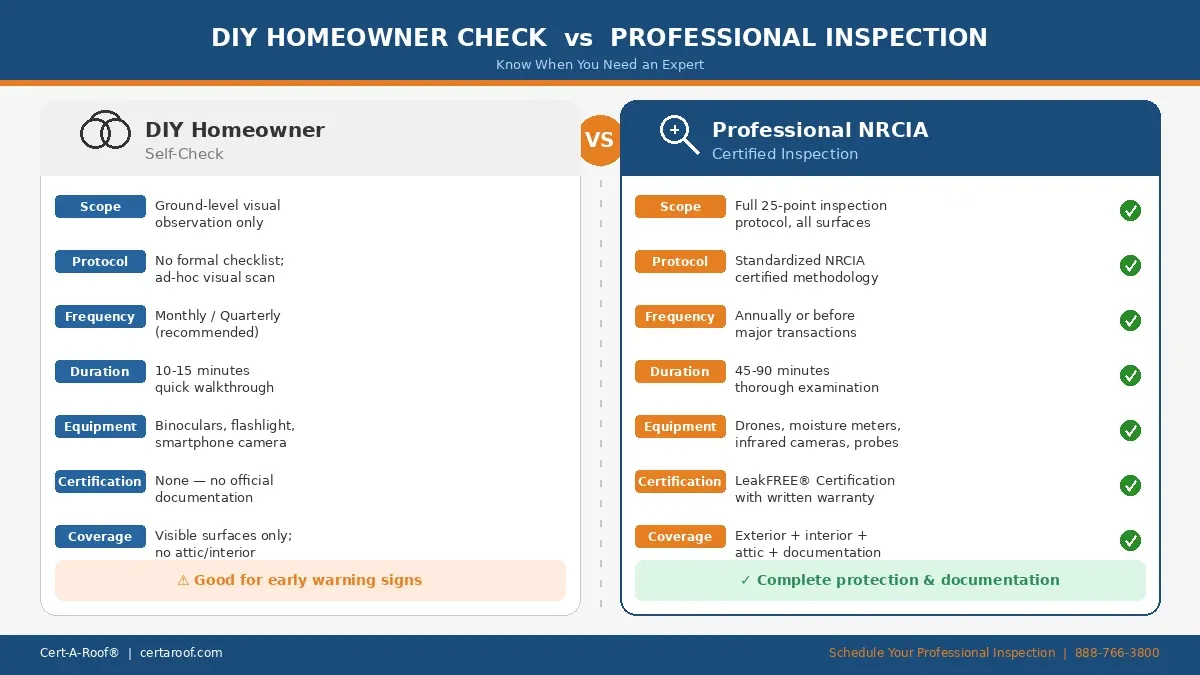
Unlike a casual visual scan from the ground, a proper roof inspection follows a documented protocol that covers materials, structural integrity, water management, and ventilation. The checklist creates a consistent, repeatable process that produces a detailed report you can use for insurance claims, real estate transactions, or maintenance planning.
At Cert-A-Roof®, our inspectors use a 25-point LeakFREE® inspection protocol developed through the National Roof Certification and Inspection Association (NRCIA). This protocol goes beyond what standard home inspectors evaluate, giving homeowners a complete picture of their roof’s condition.
Exterior Roof Inspection Checklist
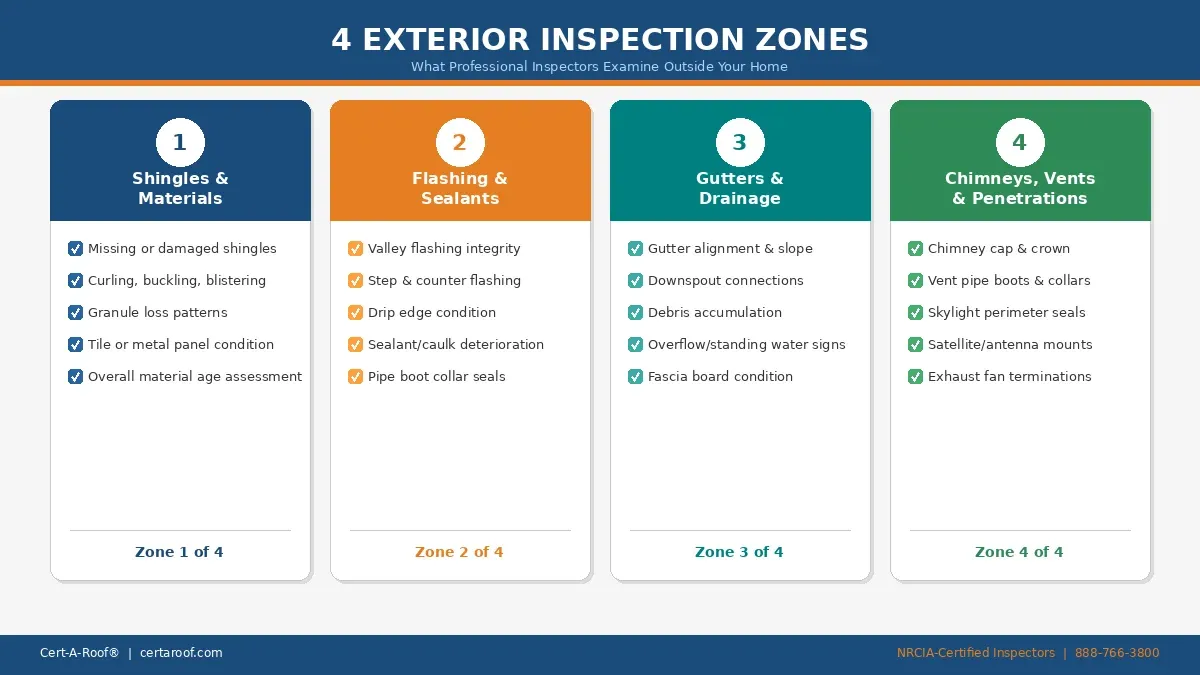
The exterior inspection is where most of the visible damage gets identified. A certified inspector examines these areas systematically, starting from the ground and working up to the roof surface.
Shingles and Roofing Materials
The roof surface is the first line of defense against weather, and it takes the most abuse. Here is what inspectors check:
- Missing shingles or tiles: Gaps in coverage leave the underlayment and decking exposed to water infiltration.
- Cracked, curled, or buckling shingles: These indicate aging, heat damage, or improper installation.
- Granule loss: Excessive granules in the gutters signal that asphalt shingles are nearing the end of their effective life.
- Blistering or splitting: Often caused by trapped moisture or poor ventilation, both of which accelerate deterioration.
- Algae, moss, or mold growth: Organic growth traps moisture against the roof surface and can cause premature material breakdown, especially in shaded areas.
- Exposed or popped nails: These create direct entry points for water.
In Southern California, UV exposure is one of the biggest threats to roofing materials. Our inspectors pay close attention to granule loss and material brittleness caused by years of intense sun.
Flashing and Sealant Points
Flashing protects the most vulnerable areas of any roof: the transitions and penetrations where different surfaces meet. During a roof assessment, inspectors examine:
- Chimney flashing: Gaps, rust, or lifted edges around the chimney base allow water to run behind the flashing and into the structure.
- Vent pipe boots: Rubber boots around plumbing vents crack and deteriorate over time, becoming one of the most common leak sources.
- Valley flashing: Roof valleys channel large volumes of water, so any compromise here leads to significant leaks.
- Skylight seals: Improperly sealed skylights are frequent culprits in residential water intrusion.
- Wall-to-roof transitions: Step flashing along walls must be properly layered and sealed to prevent wind-driven rain from entering.
- Sealant condition: Cracked, dried, or missing caulk around all penetrations gets flagged for repair or replacement.
Gutters and Drainage System
Water management is critical to roof longevity. A blocked or damaged drainage system causes water to back up under roofing materials and into the fascia. The inspection checklist includes:
- Gutter condition: Sagging, rusted, or separated sections reduce drainage efficiency.
- Downspout connections: Disconnected or improperly routed downspouts dump water against the foundation.
- Debris accumulation: Leaves, pine needles, and granules clog gutters and create standing water.
- Proper slope: Gutters must pitch toward downspouts to prevent pooling.
- Drip edge presence: A properly installed drip edge directs water into the gutter and away from the fascia board.
Chimneys, Vents, and Roof Penetrations
Every opening in the roof surface is a potential leak point. Inspectors give these areas close attention:
- Chimney cap and crown: Cracks in the chimney crown allow water to enter and cause freeze-thaw damage to the masonry (more relevant for our Montana service area).
- Plumbing vent integrity: Beyond the boot seal, inspectors check that vent pipes themselves are undamaged and properly secured.
- Exhaust vents: Bathroom and kitchen exhaust vents must terminate properly and have intact screens to prevent pest entry.
- Ridge vent continuity: Any gaps or damage along the ridge vent compromise both waterproofing and attic ventilation.
Interior and Attic Inspection Checklist
The attic tells the story that the exterior cannot. Many roof problems show up inside the attic long before visible damage appears on the outside. A thorough home roof inspection always includes an interior evaluation.
Structural Assessment
- Rafters and trusses: Inspectors look for cracking, warping, or sagging that could indicate structural overload or long-term moisture damage.
- Roof decking condition: Soft spots, delamination, or visible rot in the plywood or OSB decking are signs of water intrusion.
- Sagging ridge line: A dipping ridge suggests structural issues that need immediate professional evaluation.
- Collar ties and bracing: These reinforcements must be intact and properly connected to maintain the roof’s structural geometry.
Ventilation Check
Proper attic ventilation prevents moisture buildup and reduces heat accumulation that accelerates shingle deterioration. The inspection covers:
- Soffit vents: These intake vents must be open and unblocked by insulation to allow fresh air into the attic.
- Ridge or gable vents: Exhaust vents at the top of the attic must function properly to create adequate airflow.
- Balanced airflow: The ratio of intake to exhaust ventilation should meet or exceed building code requirements (typically 1:150 or 1:300 with a vapor barrier).
- Signs of condensation: Moisture on rafters, decking, or insulation indicates inadequate ventilation.
Insulation and Moisture Detection
- Insulation depth and condition: Compressed, wet, or displaced insulation reduces energy efficiency and can indicate chronic moisture problems.
- Water stains on decking: Dark marks or rings on the underside of the roof deck are evidence of past or active leaks.
- Daylight penetration: Visible light through the roof deck means there are gaps that allow both light and water to enter.
- Mold or mildew presence: Any fungal growth indicates persistent moisture that must be addressed at the source.
Homeowner’s DIY Roof Inspection Checklist
While a professional roof evaluation is irreplaceable, homeowners can perform basic visual checks between professional visits. Here is a simplified checklist you can use:
Ground-Level Visual Check (Monthly)
- Walk the perimeter and look for missing or damaged shingles
- Check gutters for excessive granule accumulation
- Look for sagging sections in the gutters
- Inspect downspouts for proper connection and drainage direction
- Note any visible moss, algae, or dark streaks on the roof surface
- Check for debris accumulation in roof valleys
Attic Quick Check (Quarterly)
- Look for daylight coming through the roof deck
- Check for water stains or discoloration on rafters and decking
- Feel the insulation for dampness
- Note any musty smells that could indicate mold
- Verify that soffit vents are not blocked
Post-Storm Assessment (Within 48 Hours)
- Scan for newly missing or displaced shingles
- Check around chimneys and vents for visible flashing damage
- Look for fallen debris on the roof surface
- Inspect gutters for new damage or overflow evidence
- Document any damage with photos for insurance purposes
Important: This DIY checklist helps you spot obvious problems, but it cannot replace the trained eye and specialized tools of a certified roof inspector. Many critical issues, like deteriorating underlayment, improper flashing installation, or early structural problems, are invisible from the ground.
When to Schedule a Professional Roof Inspection
Knowing when to inspect your roof is just as important as knowing what to look for. Here are the situations that call for a professional roof assessment:
- Twice per year (spring and fall): Seasonal inspections catch weather-related damage and prepare your roof for the next season’s conditions.
- After a major storm: High winds, hail, and heavy rain can cause damage that is not immediately obvious. In Southern California, Santa Ana winds are a particular concern.
- Before buying or selling a home: A roof inspection for a real estate transaction provides documented proof of the roof’s condition and can influence negotiations.
- When your roof is 15+ years old: Aging roofs develop problems more frequently and benefit from more frequent professional monitoring.
- If you notice interior water stains: Ceiling stains, peeling paint, or attic moisture are signs that something on the roof has already failed.
- Before or after major roof work: A pre-work inspection documents the starting condition, and a post-work inspection verifies the quality of repairs or installation.
Why NRCIA-Certified Inspectors Deliver Better Results
Not all roof inspections are created equal. The inspector’s training, certification, and methodology directly impact the quality and reliability of the inspection report.
A general home inspector may spend 10 to 15 minutes on the roof as part of a broader property evaluation. By contrast, an NRCIA-certified inspector conducts a focused, standalone evaluation using standardized protocols that cover every component of the roofing system.
Here is what sets NRCIA-certified inspections apart:
- Standardized 25-point protocol: Every inspection follows the same rigorous checklist, eliminating the guesswork and inconsistency that comes with informal evaluations.
- Specialized training: NRCIA-certified inspectors complete training specific to roof systems, materials, and failure modes. They are specialists, not generalists.
- Formal documentation: The inspection produces a detailed report with findings, photos, and recommendations. This documentation is accepted by insurance companies and real estate professionals.
- LeakFREE® Certification eligibility: Roofs that pass the NRCIA protocol can receive the LeakFREE® Roof Certification, a warranty-backed document that verifies the roof will remain leak-free for the certification period.
- Unbiased assessment: Certified inspectors evaluate the roof’s condition objectively without the conflict of interest that can come from a company that also sells roofing installation or replacement.
Paul Watrous, President of both Cert-A-Roof® and the NRCIA, developed many of the inspection standards used across the industry today. When you hire a Cert-A-Roof inspector, you are getting a team trained under the same leadership that wrote the book on professional roof evaluation.
How Cert-A-Roof’s Inspection Process Works
Our inspection process follows a systematic approach that has been refined over 30+ years and more than 75,000 inspections:
- Initial consultation: We discuss your roof’s age, materials, history, and any specific concerns.
- Exterior inspection: Our inspector examines every exterior component using the 25-point LeakFREE® protocol.
- Interior/attic inspection: We evaluate the attic for ventilation, insulation, structural integrity, and moisture.
- Documentation: Every finding is photographed and recorded using standardized reporting software.
- Report delivery: You receive a comprehensive inspection report with clear findings, severity ratings, and prioritized repair recommendations.
- Certification (if eligible): Roofs that meet our standards can receive the LeakFREE® Roof Certification with a warranty.
Whether you need a routine annual inspection, a pre-purchase evaluation, or a post-storm damage assessment, our process stays consistent. That consistency is what makes the results reliable.
Frequently Asked Questions About Roof Inspections
How long does a professional roof inspection take?
A thorough roof inspection typically takes between 45 minutes and 2 hours, depending on the size and complexity of the roof. Larger homes, multi-level roofs, and properties with extensive penetrations (chimneys, skylights, vents) require more time. Our inspectors take whatever time is needed to complete the full 25-point protocol without cutting corners.
How much does a roof inspection cost?
Professional roof inspection costs vary based on the inspection type, roof size, and your location. A standard residential inspection is significantly less expensive than the repairs you would face from undetected damage. Contact us for specific pricing for your property.
Can I inspect my own roof instead of hiring a professional?
You can perform basic visual checks from the ground and attic (see our DIY checklist above), and doing so regularly is a smart practice. However, a homeowner inspection cannot replace a certified professional evaluation. Many critical issues are invisible without proper training, experience, and specialized tools like moisture meters and infrared cameras.
What happens if problems are found during the inspection?
Your inspection report will detail every finding with photos, severity ratings, and repair recommendations prioritized by urgency. Minor issues may only need monitoring, while more serious problems will include specific repair options. At Cert-A-Roof, we provide transparent assessments without high-pressure upselling.
How often should I get my roof inspected?
The standard recommendation is twice per year: once in spring and once in fall. Additional inspections should be scheduled after any significant storm, if your roof is over 15 years old, or if you notice any interior signs of water intrusion such as ceiling stains or attic moisture.
Does a roof inspection include the attic?
Yes. A complete roof inspection must include an interior evaluation of the attic. The attic reveals problems like moisture intrusion, ventilation deficiencies, and structural issues that cannot be detected from the exterior alone. Any inspection that skips the attic is incomplete.
Protect Your Home with a Professional Roof Inspection
A roof inspection checklist is not just a list of items to check off. It is a proven system for protecting your home from preventable damage, extending the life of your roof, and maintaining the value of your property.
If you are in Southern California or Western Montana and want a roof assessment from NRCIA-certified professionals with 30+ years of experience, Cert-A-Roof is ready to help.
Request An Appointment or call us today at 888-766-3800 to schedule your inspection.
Comment (0)