Concrete Tile Roof Repair: Signs, Costs & Fixes
The most obvious roof problems, like a shattered tile, are easy to spot. But often, the real damage is hiding just beneath the surface. A small crack can allow water to seep through to the underlayment, the critical waterproof barrier protecting your home’s structure. By the time you see a stain on your ceiling, the problem has been developing for a while. This is why a proactive approach to concrete tile roof repair is so important. We’ll teach you how to look beyond the surface, identify the subtle clues of hidden damage, and understand why addressing small issues promptly is key to preventing major repairs.
Key Takeaways
- Look for trouble before it starts: Regularly check your roof from the ground for cracked or slipped tiles and watch for interior signs like ceiling stains. Spotting small issues early is the best way to prevent major, expensive repairs.
- Know when to call for help: A single broken tile might be a manageable DIY fix, but widespread damage, active leaks, or safety concerns are jobs for a professional. A failed DIY attempt can easily cause more harm than good.
- Maintenance is your best defense: Simple habits like cleaning your gutters and trimming overhanging branches can prevent significant damage. Combine this with an annual professional inspection to keep your roof in top condition for years to come.
What Damages a Concrete Tile Roof?
Concrete tile roofs are a popular choice for good reason, especially here in Southern California. They offer a classic look, incredible durability, and a long lifespan that can easily outlast other roofing materials. But even the toughest roofs aren’t completely immune to damage. Over the years, a mix of intense sun, seasonal winds, and simple aging can take a toll. Understanding what causes this damage is key to protecting your home and avoiding expensive surprises.
The issues can range from something as obvious as a cracked tile to more subtle problems hidden from view, like a deteriorating underlayment. Sometimes the problem isn’t with the roof itself, but with related systems like your gutters. Knowing the signs of trouble helps you catch small issues before they become major headaches. We’ll walk through the most common culprits that can compromise your concrete tile roof, so you can feel confident in keeping your home safe and dry.
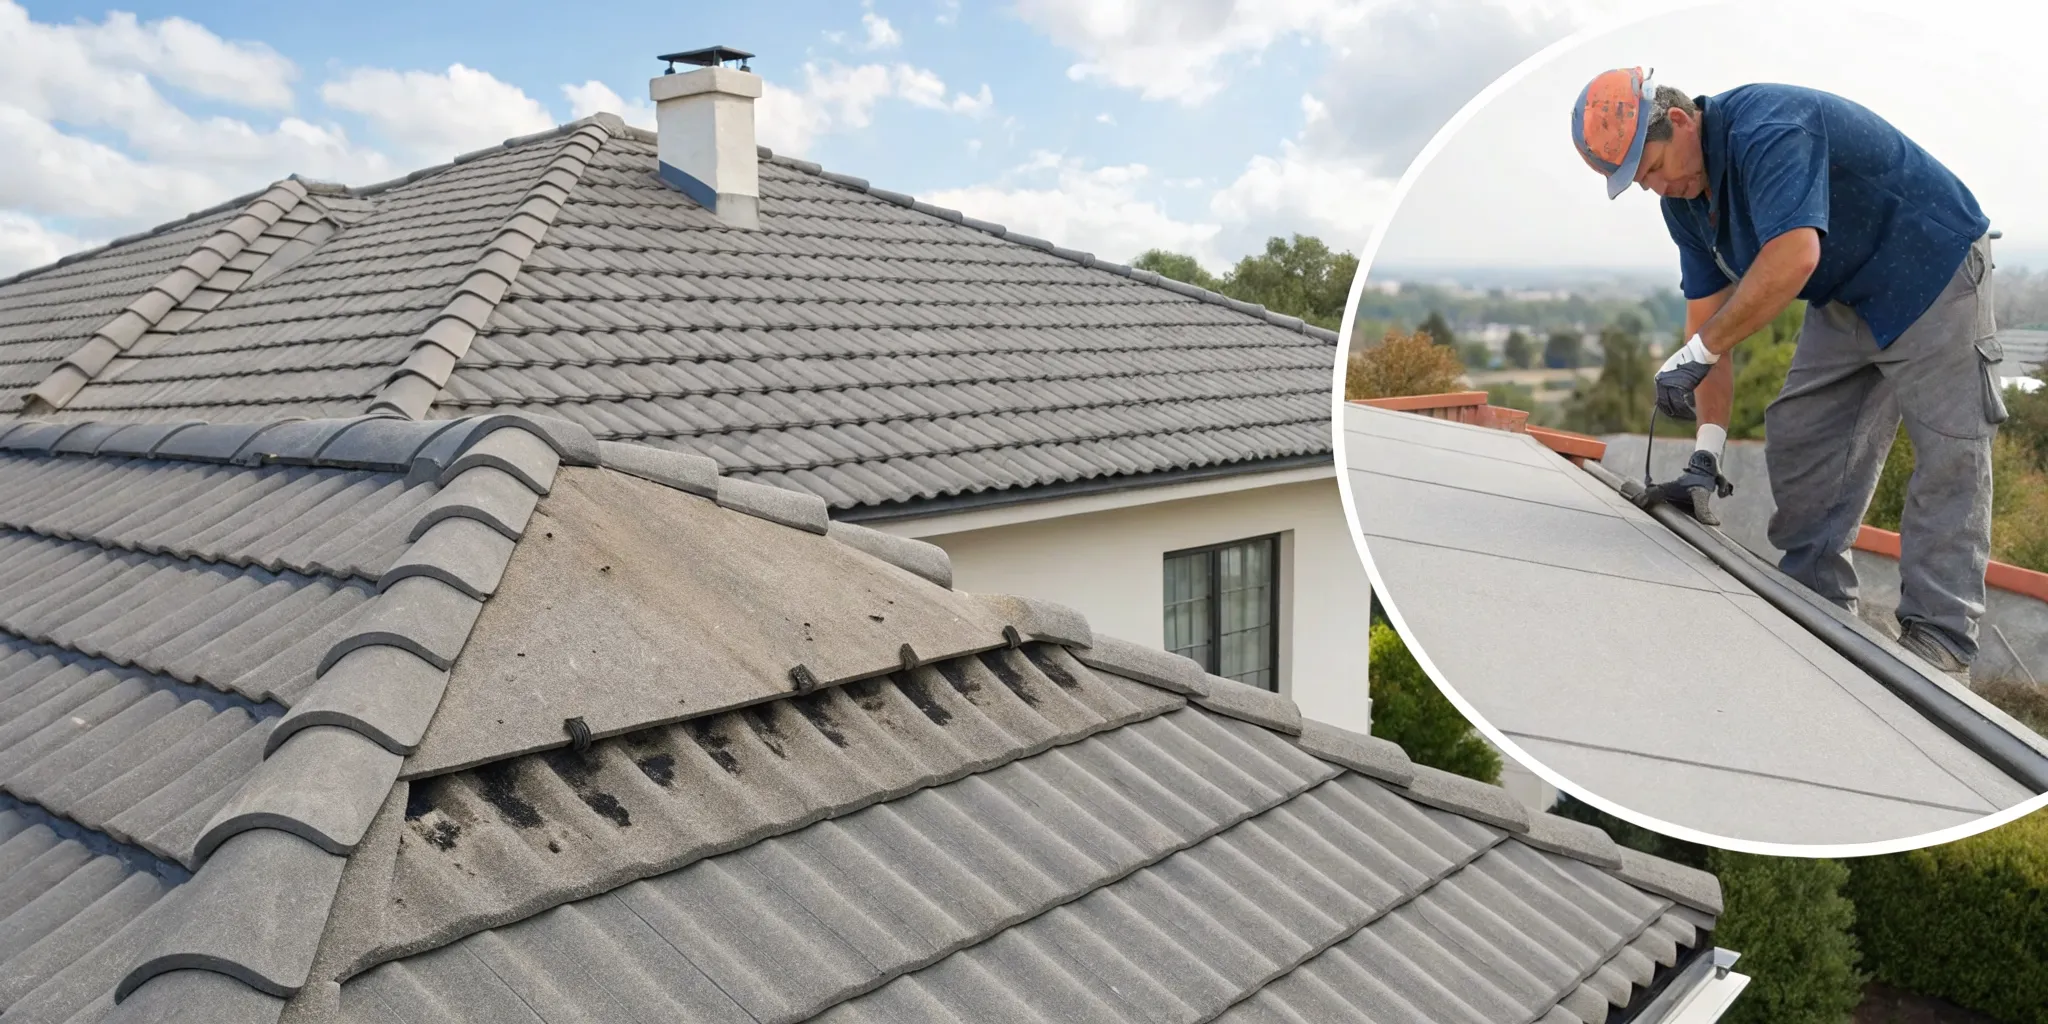
Cracked and Broken Tiles
One of the most common issues you’ll face is cracked or broken tiles. This can happen for several reasons. Heavy foot traffic, especially from an inexperienced contractor walking on the roof incorrectly, can easily cause fractures. Falling debris like tree branches during a windy day is another frequent cause. Even the natural aging process, combined with constant exposure to the elements, can make tiles brittle over time. A single cracked tile might not seem like a big deal, but it’s a breach in your roof’s first line of defense, allowing water to seep through to the underlayment and potentially cause a leak.
Loose or Slipped Tiles
Have you ever looked up at a tile roof and noticed one tile sitting slightly askew? That’s a slipped tile, and it’s a bigger problem than it looks. High winds, vibrations from nearby construction, or even improper installation can cause tiles to loosen and shift from their interlocking positions. When a tile slips, it exposes the underlayment beneath it to direct sunlight and rain. This breaks the overlapping seal that keeps your roof watertight, creating a clear pathway for moisture to get in. A thorough roof inspection can catch these out-of-place tiles before they lead to significant water damage.
Worn-Out Underlayment
The underlayment is the waterproof barrier that sits between the concrete tiles and your roof’s wooden deck. It’s your roof’s crucial safety net. While the tiles protect it from direct sun and rain, the underlayment can still wear out over decades of service. Intense heat in your attic can cause it to become brittle and crack, or it can tear over time. Because this damage is hidden beneath the tiles, you often won’t know there’s a problem until a leak appears inside your home. This is why addressing even minor tile damage promptly is so important to preserve the life of your underlayment.
Clogged Gutters and Poor Drainage
It’s easy to forget about your gutters, but they play a vital role in your roof’s health. When gutters and roof valleys become clogged with leaves, dirt, and other debris, water can’t drain away from your home properly. Instead, it backs up and pools along the edges of your roof. This standing water can easily work its way underneath the concrete tiles, saturating the underlayment and rotting the wooden structures of your roof. Regular roof maintenance is a simple, proactive step to prevent this kind of water damage.
Storm and Weather Damage
While concrete tiles are built to last, severe weather can take a toll. The intense heat of a Southern California summer followed by a sudden downpour can cause tiles to expand and contract, leading to stress cracks. Powerful Santa Ana winds can be strong enough to lift tiles and break their seals, leaving your roof vulnerable. And while hail is rare, a significant hailstorm can cause direct impact damage, shattering tiles. If you suspect a recent storm has harmed your roof, it’s wise to get a professional assessment for potential storm damage repair.
How to Spot Concrete Tile Roof Damage
Catching roof damage early can save you a lot of headaches and money down the line. The great thing is, you don’t have to be a roofing expert to notice the initial warning signs. Problems often show up in subtle ways, both inside your house and on the roof itself. Knowing what to look for is the first step in protecting your home. A quick visual check every few months, especially after a big storm, can help you spot trouble before it escalates.
Warning Signs Inside Your Home
Often, the first clue that something is wrong with your roof isn’t on the roof at all, it’s inside your home. Pay attention to your ceilings and walls, particularly on the top floor. Look for new water stains or yellowish-brown marks, which are classic signs of a leak. You might also see bubbling or peeling paint. If you notice a musty smell in your attic or upper rooms, it could point to hidden moisture and mold growth. These are clear indicators that water is getting in from somewhere, and it’s a good idea to schedule a professional roof inspection to find the source.
What to Look for on the Outside
From the ground, take a careful look at your roof’s surface. Concrete tiles are tough, but they aren’t indestructible. Scan for any tiles that are obviously cracked, chipped, or broken. Heavy impacts from falling branches or even severe weather can cause this kind of damage. Also, check if any tiles look out of place, as if they’ve slipped down. This can happen due to high winds or improper installation and leaves the underlayment exposed. Worn-out mortar around the ridge caps is another weak point that can let water seep in. If you see any of these issues, it’s time to consider roofing services to address them.
Your Attic Inspection Checklist
If you can safely access your attic, it’s one of the best places to check for roof damage. On a sunny day, turn off the lights and look up. Do you see any slivers of daylight peeking through the roof boards? That’s a direct path for water. Also, inspect the insulation and wood for any damp spots, dark stains, or signs of mold. This tells you exactly where a leak is occurring. You can also check the waterproof underlayment beneath the tiles. If you see any tears or significant wear, that layer of protection is compromised. A thorough check helps ensure your home has a certified roof protecting it.
How to Repair a Concrete Tile Roof
If you’ve spotted a cracked tile or a small leak, you might be able to handle the repair yourself with the right approach. This guide walks you through the basic steps for a minor fix. Remember, concrete tiles are heavy and roofs can be dangerous places. If you feel unsure at any point, or if the damage seems widespread, your safest bet is to contact a professional. For small, isolated issues, however, a DIY repair can save you time and money.
Gather Your Tools and Materials
Before you even think about getting on the ladder, make sure you have everything you need within reach. A mid-project trip to the hardware store is no fun, especially when your roof is exposed.
Here’s a basic checklist for a simple tile replacement:
- Replacement tiles that match your current roof
- A flat pry bar for lifting tiles
- A hammer and roofing nails
- Roofing sealant or adhesive
- A trowel for applying mortar, if needed
- Safety gear, including gloves with a good grip and safety glasses
Having these items ready will make the job go much smoother and help you work more efficiently once you’re on the roof.
Put Safety First
Working on a roof requires your full attention, and safety should always be your top priority. Never attempt a roof repair on a wet, icy, or windy day, as surfaces can be incredibly slick. Make sure your ladder is sturdy and placed on solid, level ground. Always wear shoes with excellent grip to prevent slipping. It’s also a good idea to have a spotter or work with a partner who can help from the ground. If your roof has a steep pitch or you’re not comfortable with heights, it’s best to leave the work to a certified roofing expert.
Find the Damaged Area
Locating the source of a leak can sometimes feel like detective work. The best place to start is often inside your attic. On a sunny day, carefully look for any beams of light shining through the roof deck. On a rainy day, look for water stains or active drips. Once you’ve pinpointed the general area from inside, mark it. Then, head outside to find the corresponding spot on the roof. Look for obviously cracked, broken, or slipped tiles. Pay close attention to areas around flashing, vents, and in the roof’s valleys, as these are common trouble spots.
Replace the Damaged Tiles
Once you’ve found the culprit, it’s time to swap it out. To remove the broken tile, you’ll need to gently lift the tile directly above it. Slide your flat pry bar under the upper tile and carefully prop it up just enough to create some wiggle room. Be gentle, as you don’t want to crack the neighboring tiles. Once the upper tile is lifted, you should be able to slide the damaged tile out. If it’s nailed down, you may need to use the pry bar to carefully pull the nail first.
Repair and Seal the Underlayment
With the broken tile removed, you have a clear view of the underlayment. This waterproof barrier is your roof’s secondary defense against water, so you need to inspect it carefully. Look for any tears, holes, or worn-out spots. For a very small puncture, you can apply a waterproof patch. Simply slide the patch underneath the tear, ensuring it extends a few inches in every direction, and press it down firmly. If you see extensive damage, like large rips or crumbling material, this indicates a more serious problem that requires a professional roofing service.
Temporary Fix vs. Permanent Repair
Sometimes you might find a tile with just a hairline crack. For a quick, temporary fix, you can apply a bead of roofing sealant directly into the crack. This can stop a small drip in its tracks, but it’s important to understand this is not a long-term solution. The sealant will eventually break down under the sun and elements. The only permanent repair for a cracked or broken tile is to replace it completely. Think of sealant as a bandage that buys you time to get a proper replacement tile.
How Much Will Concrete Tile Roof Repair Cost?
Let’s talk about the bottom line. Budgeting for a roof repair can feel stressful, but understanding the potential costs can make the process much smoother. The final price for a concrete tile
Typical Costs by Type of Damage
On average, homeowners might spend around $1,800 to repair a 10-by-10-foot section of a tile roof. However, this is just a starting point. The cost for your specific roof repair will depend on the problem at hand. For instance, replacing a single cracked tile is a relatively small fix, often costing between $25 and $50 per tile. If you’re dealing with a leak, the repair could range from $150 to $500, depending on its source and the extent of the water damage. The more widespread the issue, the higher the cost will be, so catching problems early is always a good idea.
DIY vs. Professional Repair Expenses
Tackling a roof repair yourself might seem like a great way to save money on labor, but it comes with serious risks. Without proper experience, a simple mistake can lead to bigger problems, like improper tile placement that causes major leaks down the road. Professional roofers not only have the right tools and safety equipment but also bring the expertise to do the job correctly the first time. While you’ll pay for labor, you’re also paying for peace of mind, quality workmanship, and often a warranty on the repair. A botched DIY job can end up costing far more to fix than hiring a professional from the start.
What Affects the Final Price?
Several key factors will influence your final repair bill. The complexity of your roof is a big one; a steep pitch or multiple levels can increase labor time and costs. The specific type of concrete tile on your roof also matters, as some styles are more expensive or harder to source than others. Of course, the extent of the damage plays the largest role. A few cracked tiles are much less expensive to fix than widespread underlayment failure. To get a truly accurate estimate, it’s best to have a professional roof inspection. This will identify all underlying issues and give you a clear, detailed quote for the necessary work.
Breaking Down Material and Labor Costs
When you get a quote, it will generally be broken down into materials and labor. Labor is a significant portion of the expense, often making up around 60% of the total bill. The cost per square foot for a repair, including both materials and labor, can range from $8 to $23. This variation depends on the tile type and the complexity of the job. For example, the materials for replacing a few tiles are minimal, but the labor to properly remove the old ones, check the underlayment, and secure the new ones is where the skill comes in. Understanding this breakdown helps you see the value in professional service.
DIY or Hire a Pro for Your Tile Roof Repair?
Deciding whether to pull out the ladder yourself or call in a professional is a big question for any homeowner facing a roof issue. While the DIY route can seem like a money-saver, roofing is one area where a small mistake can lead to much bigger, more expensive problems. Your safety, the integrity of your roof, and your peace of mind are all on the line. Let’s walk through when a DIY fix might be okay and when it’s absolutely time to call for backup.
When to Tackle the Job Yourself
If you’re comfortable with heights and have the right safety gear, some minor roof tasks are manageable. Catching a small issue early can prevent a major headache later. For example, if you spot a single cracked tile in an easily accessible area, you might be able to replace it. Other simple maintenance tasks, like carefully cleaning moss off your tiles or clearing debris from your gutters after a storm, can also fall into the DIY category. These small jobs, when done correctly and safely, are key to your roof’s longevity. However, this is only for the most minor of issues. Anything more complex requires a deeper look.
Signs You Need to Call a Professional
It’s time to put down the tools and pick up the phone when the problem goes beyond a simple fix. If your roof is very steep or multiple stories high, safety becomes a major concern. Leave it to the experts. Widespread damage, like many broken or missing tiles, is another clear sign you need professional help. If you’ve noticed signs of a leak inside your home, such as water stains on the ceiling or damp spots in the attic, the problem is likely more serious than it appears. A professional roof inspection can identify the true source of the leak, which often originates far from where the water shows up.
Avoid These Common DIY Mistakes
One of the biggest risks with DIY roof repair is making the problem worse. A common mistake is using poor installation techniques. Simply sliding a new tile into place without properly securing it can lead to future leaks. Another frequent error is buying the wrong materials. Concrete tiles come in many shapes, sizes, and colors, and getting an exact match is crucial for a watertight seal. It’s also a mistake to assume one broken tile is an isolated issue. It could be a sign of a larger, underlying problem with the underlayment or flashing. These missteps can turn a small repair into a major re-roofing project.
How to Prevent Future Roof Damage
The best repair is the one you never have to make. A little proactive care can go a long way in preventing damage to your concrete tile roof. Make it a habit to visually inspect your roof from the ground at least twice a year, especially after major storms. Clear away any leaves or debris that have collected in the valleys or around vents. It’s also smart to keep tree branches trimmed back and away from your roofline to prevent scraping and falling limbs. For a more thorough check-up, scheduling a professional roof maintenance service annually can help you catch and address potential issues before they become costly emergencies.
Related Articles
- How to Handle Roof Repair for Storm and Wind Damage
- Roof Inspection for Homeowners Insurance: What to Expect
- Roof Repair
- How Much Does a New Roof Cost? A Full Breakdown
Frequently Asked Questions
How often should I have my concrete tile roof professionally inspected? A professional inspection once a year is a great rule of thumb. It helps you catch small issues before they become big problems. It’s also smart to schedule an inspection after any major weather event, like a severe windstorm, just to make sure everything is still secure and intact.
Is one small crack in a tile really that urgent to fix? Yes, it’s best to address it right away. That small crack is a weak spot in your roof’s armor. Water can seep through it and begin to wear down the underlayment, which is your home’s main defense against leaks. Taking care of a single tile now is much easier and less expensive than dealing with water damage later.
Can I walk on my concrete tile roof to check for damage myself? It’s generally not a good idea. Concrete tiles are strong, but they can easily crack under concentrated pressure if you step in the wrong spot. It’s also a significant safety risk. You can spot many issues like slipped or broken tiles from the ground with a pair of binoculars. For a closer look, it’s always safest to call a professional who knows how to move across a tile roof without causing damage.
How do I know if I need a simple repair or a full re-roof? A repair is usually sufficient for isolated problems, like a few cracked or missing tiles in one section. A full re-roof becomes necessary when the damage is widespread or, more importantly, when the underlayment beneath the tiles has failed. Since the underlayment is hidden, a professional inspection is the only way to determine its condition and decide the best course of action.
What is the typical lifespan of a concrete tile roof? With proper installation and consistent maintenance, a concrete tile roof can easily last 50 years or more. The tiles themselves are incredibly durable and can withstand decades of sun and weather. The key to reaching that long lifespan is taking care of the entire roofing system, including the underlayment and gutters, to prevent premature aging.
Comment (0)