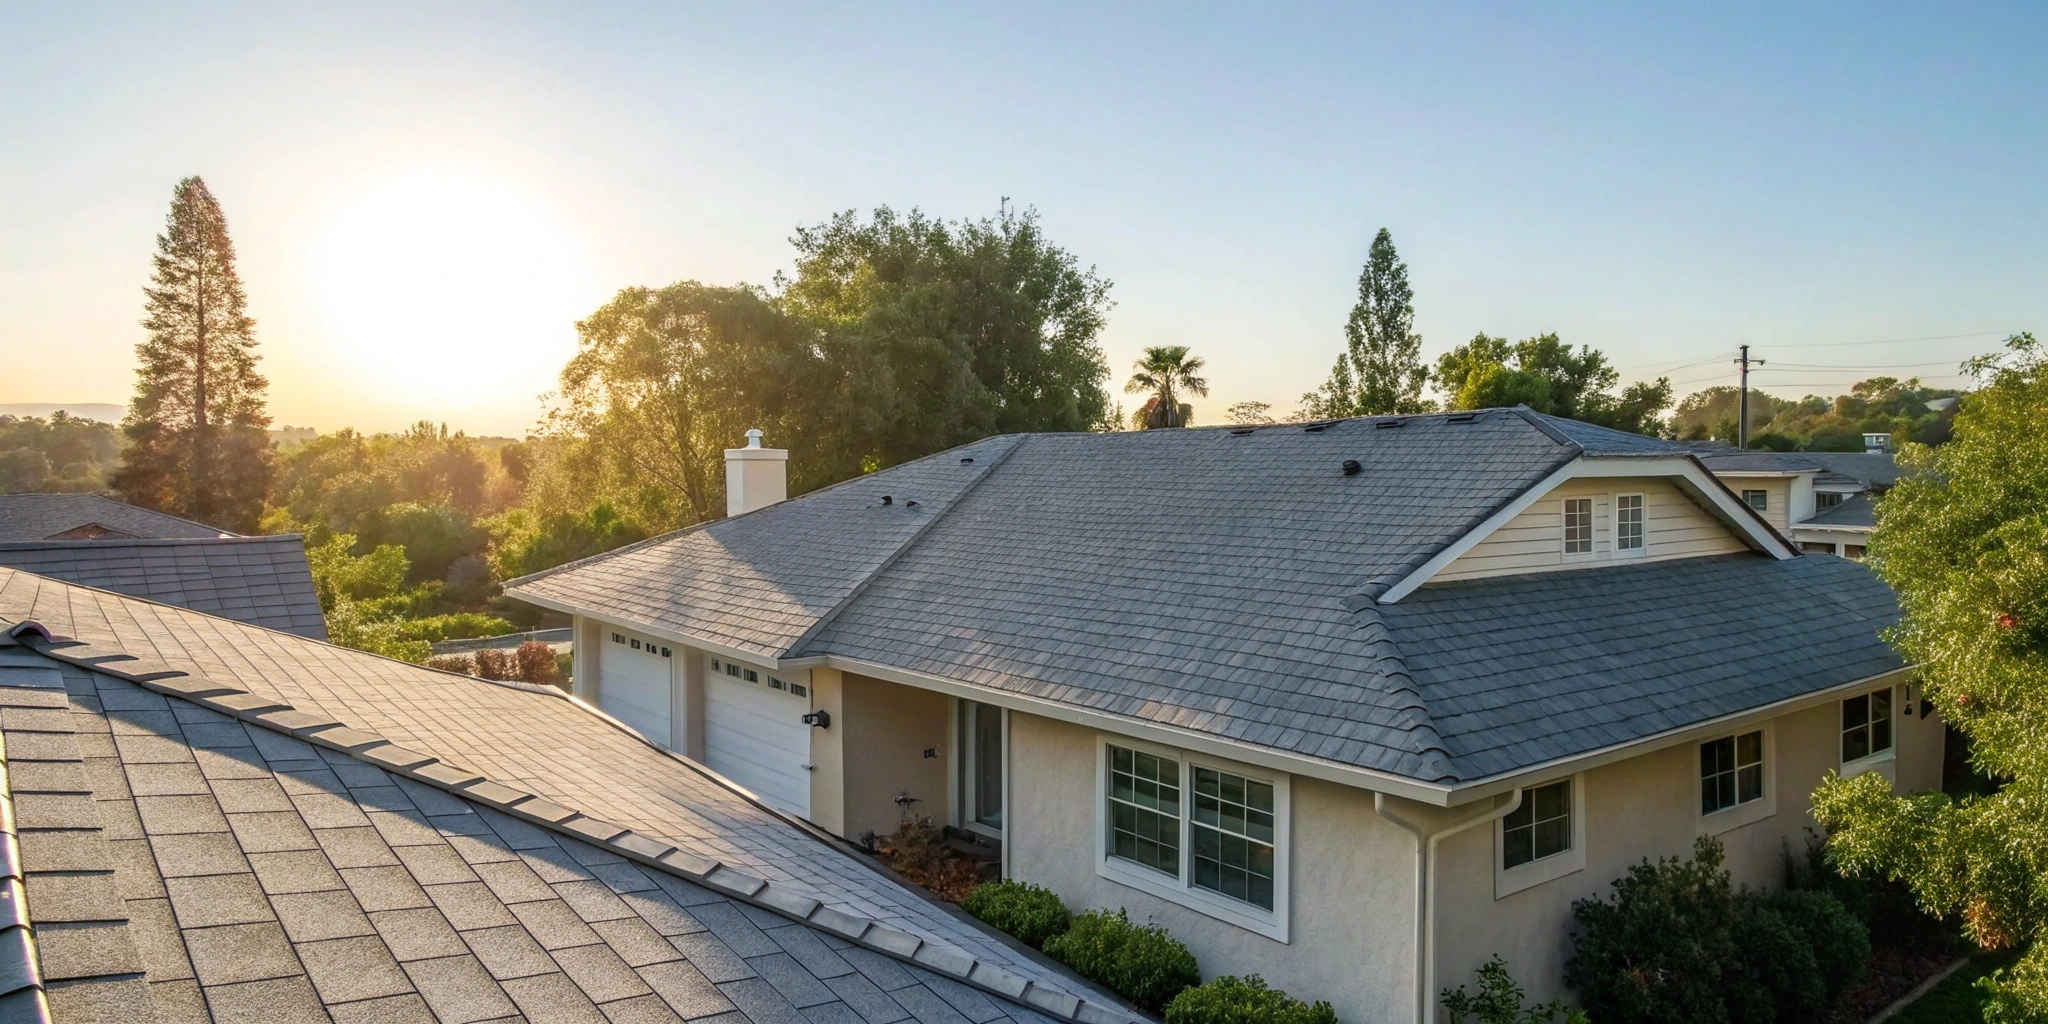
A Guide: Asphalt Shingle Roof Installation in San Diego
A new roof does more than just protect your home from the elements; it completely transforms its appearance and can significantly increase its value. If you’re looking for a material that offers incredible design versatility without the premium price tag of slate or tile, asphalt shingles are an excellent choice. Modern architectural and luxury shingles can mimic the look of high-end materials, giving your home a stunning visual upgrade. This guide will help you navigate the choices, from picking the perfect color and texture to understanding the long-term return on your investment. We’ll walk you through every step of a successful asphalt shingle roof installation in San Diego, ensuring your home looks its best and is protected for decades.
Key Takeaways
- Balance Style, Performance, and Budget: Choose the right asphalt shingle by weighing your options. Architectural shingles offer a popular mix of durability and appearance, while considering lighter colors or cool-roof shingles can significantly lower your energy bills in the San Diego sun.
- Vet Your Contractor Thoroughly: The quality of your roof installation is just as crucial as the materials. Always confirm your roofer has a valid C-39 license, carries both liability and workers’ compensation insurance, and ask if they hold manufacturer certifications for access to better warranties.
- Protect Your Investment with Regular Care: A new roof requires simple maintenance to reach its full lifespan. Schedule an annual professional inspection, keep your gutters and roof surface clear of debris, and watch for warning signs like cracked shingles or granules in your gutters.
Why Choose Asphalt Shingles for Your San Diego Home?
When you picture a classic American home, there’s a good chance it has an asphalt shingle roof. They offer a fantastic combination of durability, style, and affordability that’s hard to beat. For San Diego homeowners, they are an especially smart choice, providing reliable protection that looks great without breaking the bank. But it’s not just about popularity. Asphalt shingles are engineered to perform well in our sunny Southern California weather, delivering real value from energy efficiency to versatile design options.
How Asphalt Shingles Handle the San Diego Climate
San Diego’s weather is mostly beautiful, but your roof still needs to handle year-round sun exposure, occasional heavy rains, and Santa Ana winds. Asphalt shingles are up to the task. Modern shingles are designed for excellent durability, with many options offering high wind resistance ratings to keep your home secure. They also provide a reliable barrier against moisture, preventing leaks when winter storms roll through. A key benefit is that asphalt shingles are lightweight, making them suitable for most roof structures without requiring additional support. When you choose professional roofing services, you can be confident your shingle roof is installed to withstand our coastal climate for years to come.
Saving Energy and Protecting Against UV Rays
In a place with as much sunshine as San Diego, your roof plays a big role in your home’s energy efficiency. Traditional dark shingles absorb heat, driving up attic and indoor temperatures. This makes air conditioning units work harder, increasing energy costs. This is where modern asphalt shingles really shine. Many manufacturers now offer “cool roof” shingles, which are designed with reflective granules that bounce the sun’s UV rays back into the atmosphere. By absorbing less heat, a cool roof keeps your home more comfortable and can significantly lower your cooling bills. Choosing an ENERGY STAR certified shingle is a simple way to make your home greener and save money.
A Look at the Cost vs. Other Roofing Materials
Let’s talk about one of the most practical benefits: the price. Asphalt shingles are one of the most cost-effective roofing materials available, making them an accessible option for many homeowners. They offer a great return on investment by providing solid, long-lasting protection without the premium price tag of materials like slate or tile. This affordability also extends to repairs, which are typically simpler and less expensive. You have options, too. For instance, 3-tab shingles offer a simpler, uniform appearance, while architectural shingles provide enhanced durability and aesthetics, which can justify their higher cost. This flexibility allows you to find a solution that fits your budget and style.
What Types of Asphalt Shingles Can You Choose?
Once you’ve decided on asphalt shingles, the next step is picking the right type for your home. This choice comes down to balancing your budget, desired aesthetic, and long-term performance goals. Think of it less like picking a product and more like choosing an investment in your home’s protection and curb appeal. Each style offers a different combination of durability, texture, and cost, so understanding the basics will help you make a decision you’ll be happy with for years to come.
The three main categories you’ll encounter are three-tab, architectural, and luxury shingles. While they are all made from similar materials, their construction and appearance vary quite a bit. Let’s walk through what makes each one unique so you can find the perfect fit for your San Diego property.
Three-Tab Shingles
Three-tab shingles are the most traditional and budget-friendly option on the market. You can spot them easily by their flat, uniform appearance—each shingle is a single layer cut to look like three separate pieces, or “tabs.” This creates a simple, repeating pattern across the roof.
While they offer reliable protection, their single-layer design means they have a shorter lifespan and lower wind resistance compared to other types. They are a great choice if you’re working with a tight budget or need a straightforward roofing solution for a rental property. However, for a long-term family home, you may want to consider an upgrade.
Architectural Shingles
Architectural shingles, often called dimensional shingles, are the most popular choice for homeowners today, and for good reason. They are constructed with multiple layers of asphalt fused together, which creates a richer, more varied texture that adds depth and dimension to your roof. This layered construction doesn’t just look great; it also makes them heavier and more durable than their three-tab counterparts.
They offer a longer lifespan, better resistance to wind and weather, and a much more modern look. For many San Diego homeowners, architectural shingles hit the sweet spot between affordability and high-end performance, providing a significant visual and structural upgrade without the premium price tag of luxury options.
Luxury Shingles
If you’re looking for top-of-the-line performance and a standout appearance, luxury shingles are the way to go. These are the thickest, heaviest, and most durable asphalt shingles available. They are expertly designed to mimic the appearance of high-end roofing materials like natural slate or classic wood shakes, giving you that premium look without the associated cost and maintenance.
Beyond their stunning aesthetics, luxury shingles offer the highest level of protection against impact and extreme weather. While they are the most expensive option in the asphalt shingle family, they make a powerful statement and can dramatically enhance your home’s curb appeal and resale value.
Top Brands to Know: GAF, Owens Corning, and CertainTeed
The quality of your shingles often comes down to the manufacturer. In the roofing world, a few names consistently stand out for their quality, innovation, and strong warranties. GAF, Owens Corning, and CertainTeed are the leading brands you’ll want to look for. Each offers a full range of products, from basic three-tab to stunning luxury lines.
Choosing a trusted brand ensures you’re getting a product that has been rigorously tested. Many, like Owens Corning, also offer robust warranty programs that provide peace of mind. When you work with a certified contractor, you can often get access to enhanced warranties that cover both the materials and the workmanship, giving you the ultimate protection for your investment.
How Much Does an Asphalt Shingle Roof Cost in San Diego?
Figuring out the budget for a new roof is often the first, and most important, step for any homeowner. A new asphalt shingle roof is a significant investment in your property’s safety and value, and the final price tag can vary quite a bit. The total cost depends on a mix of factors, including the specific materials you choose, the size and complexity of your roof, and the labor involved.
To give you a clearer picture of what to expect, let’s break down the main components that make up the total cost of an asphalt shingle roof installation in the San Diego area. Understanding these elements will help you make an informed decision and find a solution that fits both your home’s needs and your budget. At Cert-A-Roof, we believe in transparency, which is why we provide detailed estimates that explain every part of the process. Our roofing services are designed to offer quality and value, ensuring you know exactly what you’re paying for.
Breaking Down Material Costs
The shingles themselves make up a substantial portion of your total roofing cost. In San Diego, you’ll find that leading manufacturers like GAF and Owens Corning are popular choices for their durability and style options. The price of materials is directly tied to the type of shingle you select. For instance, basic three-tab shingles are the most budget-friendly option, while architectural shingles offer more dimension and a longer lifespan for a mid-range price. At the higher end, luxury shingles mimic the look of natural slate or cedar shakes, providing a premium aesthetic at a premium cost. Your choice will ultimately shape the foundation of your budget.
Understanding Labor and Installation Fees
Labor is the other major piece of the cost puzzle. In San Diego, you can generally expect labor fees to run from $2.50 to $3.50 per square foot. In roofing terms, this is often quoted per “square,” which is a 100-square-foot area. So, you’re looking at about $250 to $350 per square for the installation work. This fee covers the expertise, time, and safety measures required to install your roof correctly. While it might be tempting to find the cheapest labor, remember that quality installation is what ensures your roof will last for decades. A professional team, like the one you’ll find when you contact us, has the skill to get the job done right.
How Roof Size and Complexity Affect Price
Not all roofs are created equal, and the unique design of your home’s roof will influence the final cost. A simple, single-story gable roof will be much quicker and easier to shingle than a multi-level roof with steep pitches, dormers, valleys, and skylights. Each of these features adds complexity to the job, requiring more time for precise cutting, fitting, and sealing. The overall square footage is a primary factor, but these structural details increase labor hours and the amount of materials needed. A larger, more intricate roof will naturally have a higher price tag than a smaller, straightforward one.
Other Potential Costs to Keep in Mind
Beyond shingles and labor, a few other expenses can pop up during a roof replacement. First, there’s the cost of removing and disposing of your old roof. You’ll also need to budget for permits, which can cost up to $500 depending on your local San Diego municipality. If the crew discovers any damage to the underlying roof deck once the old shingles are off, those repairs will be an additional cost. Finally, don’t forget about essential components like underlayment, flashing, and proper ventilation, which are critical for a healthy roofing system. A thorough roof inspection beforehand can help identify many of these potential issues early on.
How to Choose the Right San Diego Roofing Contractor
Selecting the right shingles for your home is a big decision, but choosing the right team to install them is just as critical. The quality of the installation determines the longevity, safety, and performance of your new roof. In a place like San Diego, you have plenty of options, which makes it even more important to do your homework. A great contractor not only does excellent work but also communicates clearly, respects your property, and stands behind their installation. Taking the time to find a qualified, trustworthy professional will ensure your investment is protected for years to come. Think of it as finding a long-term partner for your home’s most important shield against the elements. The right roofing services provider will give you peace of mind from the initial estimate to the final cleanup.
Check for Licenses and Credentials
Before you even think about getting an estimate, your first step should be to confirm that any potential contractor is properly licensed. In California, a roofing contractor must have a C-39 license from the Contractors State License Board (CSLB). This isn’t just a formality; a license proves the contractor has met state requirements for experience and knowledge. Choosing a licensed contractor ensures they are accountable and familiar with local San Diego building codes. It protects you from unqualified individuals who might cut corners or perform unsafe work. You can easily verify a contractor’s license online, and any reputable roofer will be happy to provide their license number upfront.
Look for Manufacturer Certifications
While a state license is the minimum requirement, manufacturer certifications show a contractor has gone the extra mile. Top shingle brands like GAF and Owens Corning offer special training and certification programs to roofers who have a proven track record of high-quality work. Hiring a certified installer often comes with significant benefits, like access to enhanced warranties that cover both materials and workmanship for a longer period. It’s a clear sign that the contractor is committed to their craft and up-to-date on the best installation techniques for the specific products you’re choosing. This level of expertise is a key part of our commitment to providing a certified roof.
Verify Their Insurance and Bonding
This is a non-negotiable step for protecting yourself and your property. A legitimate roofing contractor must carry two key types of insurance: general liability and workers’ compensation. General liability covers any damage that might occur to your property during the project, while workers’ compensation protects you from being financially responsible if a worker is injured on your job site. Without it, you could be on the hook for medical bills and other costs. Always ask for a certificate of insurance and don’t hesitate to call the insurance provider to confirm the policy is active. It’s a simple check that can save you from major financial and legal headaches down the road.
Get Multiple Estimates and Check References
It can be tempting to go with the first roofer you talk to, but it’s wise to get at least three written estimates. This isn’t just about comparing prices—it’s about comparing what you get for your money. A detailed estimate should clearly outline the scope of work, the specific materials being used, the project timeline, and the payment schedule. Be wary of any bid that is significantly lower than the others, as it could indicate subpar materials or shortcuts. Once you have a few solid contenders, ask for references from recent customers and check online reviews. Looking through a contractor’s photo gallery of past projects can also give you a great sense of their work quality.
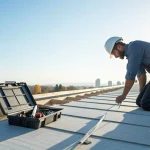
What to Expect During Your Roof Installation
Getting a new roof is a big project, but knowing what’s coming can make the whole experience feel much more manageable. A professional roofing installation is a multi-step process designed to protect your home for decades to come. While every project is a little different, the core steps remain the same. From the initial tear-off to the final nail, a skilled crew works methodically to ensure every layer is secure and weatherproof.
Think of it as building a complete system, not just laying down some shingles. Each step builds on the last, creating a durable shield for your home. We’ll walk you through the five main stages of a typical asphalt shingle installation. This way, you’ll know exactly what’s happening on your property and can feel confident in the process from start to finish. A quality roofing service will keep you informed, but being a knowledgeable homeowner is always a plus.
Step 1: The Initial Inspection and Assessment
Before any new shingles go on, the old ones have to come off. The process begins with your roofing crew carefully stripping away the existing layers of your roof. This isn’t just about making room for the new material; it’s a crucial diagnostic step. Once the old roof is gone, the team gets a clear look at the underlying wooden structure, known as the roof deck. They will perform a thorough roof inspection to check for any soft spots, rot, or water damage that might have been hidden. Addressing these issues now is essential for ensuring your new roof has a solid and stable foundation to rest on for years to come.
Step 2: Prepping the Site and Removing the Old Roof
With the plan in place, the crew gets to work preparing your property. They’ll take care to protect your home and landscaping by covering siding, windows, and garden beds with heavy-duty tarps. Then, the tear-off begins. This is often the loudest and messiest part of the job, as the team removes all the old shingles and roofing materials. They work efficiently to clear the roof deck completely, making way for the new system. A professional team understands the importance of a clean workspace and will manage the debris, hauling it away so you don’t have to worry about it. This preparation ensures a smooth and safe installation process.
Step 3: Installing Underlayment and Flashing
Once the roof deck is prepped and repaired, it’s time to install the first layers of protection. A special roofing underlayment is rolled out across the entire roof deck. This material acts as a critical secondary moisture barrier, protecting the wood from any water that might find its way under the shingles. Next, the crew installs metal flashing. Flashing is placed in areas most vulnerable to leaks, such as around chimneys, vents, skylights, and in the valleys where roof planes meet. Properly installed underlayment and flashing are the unsung heroes of a watertight roof, directing water away from critical areas and into your gutters.
Step 4: Laying and Securing the New Shingles
This is the stage where your new roof really starts to take shape. The installation begins at the eaves with a drip edge and a starter strip of shingles, which prevents water from getting under the first course. From there, the crew works their way up the roof, laying the shingles in a precise, overlapping pattern. Each shingle is secured with roofing nails, placed according to the manufacturer’s specifications to guarantee maximum wind resistance. The team’s skill and attention to detail here are what create the beautiful, uniform look of a finished roof while ensuring it performs flawlessly against the elements.
Step 5: Final Inspection and Cleanup
After the last shingle is secured, the job isn’t over. A project manager or crew leader will conduct a meticulous final inspection of the entire roof, checking that every detail meets quality standards. Once the work is approved, the final cleanup begins. The crew will remove all equipment and leftover materials from your property. They’ll clear out the gutters and use magnetic rollers to sweep your lawn, driveway, and garden beds for any stray nails. A professional contractor takes pride in leaving your property as clean as they found it, with nothing left behind but a beautiful, durable new roof.
Understanding Your Roofing Warranties
A new roof is a significant investment, so it’s smart to understand how it’s protected. When you get a new asphalt shingle roof, you’ll typically receive two separate warranties: one from the shingle manufacturer and another from your roofing contractor. These aren’t just pieces of paper to file away; they are your safety net against material defects and installation errors. Knowing the difference between them and what each one covers will help you make informed decisions and ensure your peace of mind for years to come. Let’s break down what you need to know about each type of coverage.
Manufacturer’s Warranty on Materials
The manufacturer’s warranty covers the physical shingles and roofing materials themselves. Major brands like GAF and Owens Corning stand behind their products, offering warranties that protect against manufacturing defects. These can range from 20 to 50 years, depending on the quality of the shingle you choose. However, these warranties come with specific conditions. The manufacturer will often require that the materials be installed according to their exact specifications by a certified professional. Failing to follow these guidelines or neglecting routine maintenance can void your coverage, so it’s essential to read the fine print and work with a contractor who understands these roofing service requirements.
Contractor’s Guarantee on Workmanship
While the manufacturer covers the materials, your contractor is responsible for the quality of the installation. A workmanship guarantee protects you from errors made during the roofing process, like improper nailing or faulty flashing installation, which are common causes of leaks. A reputable contractor will always offer a guarantee on their work, typically lasting anywhere from one to ten years. This is a huge indicator of a company’s confidence in its team and processes. When you choose a contractor, make sure their workmanship guarantee is clearly outlined in your contract. It’s your primary protection against installation-related problems.
What’s Covered (and What’s Not)
It’s crucial to know where one warranty ends and the other begins. The manufacturer’s warranty won’t cover damage from a hurricane or a leak caused by a poorly installed vent pipe—that falls under workmanship. Likewise, your contractor’s guarantee won’t cover a batch of shingles that starts to curl and fail prematurely due to a factory defect. Most warranties, both from the manufacturer and the contractor, also require you to take care of your roof. Neglect, unauthorized repairs, or damage from falling trees typically aren’t covered. This is why scheduling regular roof inspections is so important; it helps you catch small issues before they become big problems and keeps your warranty valid.
Avoid These Common Shingle Selection Mistakes
Choosing and installing a new roof is a major home improvement project, and a few small missteps can lead to big problems down the road. When you’re investing in your home’s protection, you want to get it right the first time. Making informed decisions from the start will save you from costly repairs and ensure your new roof lasts for decades. Let’s walk through some of the most common mistakes homeowners make so you can sidestep them with confidence.
Reusing Old Flashing and Components
It might seem like a clever way to cut costs, but reusing old flashing is one of the riskiest shortcuts in roofing. Flashing consists of the metal pieces installed around chimneys and vents to direct water away from seams. Over time, this metal can warp, rust, or develop tiny holes. Placing brand-new shingles around compromised flashing undermines the integrity of the entire system. A professional roof installation should always include new flashing to create a complete, watertight seal for your home, protecting it from preventable water damage.
Forgetting About Proper Ventilation
A roof needs to breathe, especially in the Southern California sun. Proper ventilation allows hot, moist air to escape your attic, preventing a host of problems. Without a good airflow system, heat gets trapped, which can bake your shingles from below and shorten their lifespan. Moisture buildup is another major concern, as it can lead to mold, mildew, and rot in your roof’s decking. A qualified roofing contractor will assess your attic’s ventilation and recommend a balanced system. This simple step protects your roof, improves energy efficiency, and maintains healthy air quality inside your home.
Picking the Wrong Color for the Climate
In a sunny place like San Diego, your shingle color is more than just a style choice—it’s an energy decision. Dark-colored shingles absorb a significant amount of solar heat, which then radiates into your attic and living spaces. This forces your air conditioner to work overtime, driving up your energy bills. Instead, consider lighter shades or specially designed cool-roof shingles that reflect more sunlight. These energy-efficient options can keep your attic temperature much lower, leading to noticeable savings and a more comfortable home. It’s a smart move for your wallet and the environment.
Overlooking the Warranty Details
A new roof comes with two important warranties: one from the shingle manufacturer covering defects and another from your contractor guaranteeing their work. It’s a mistake to focus only on the materials warranty. Even the highest-quality shingles can fail if they aren’t installed correctly. Before signing a contract, make sure you receive and understand the contractor’s workmanship warranty in writing. Ask what it covers, how long it lasts, and what actions could void it. A reputable company will stand behind their work, giving you peace of mind that your investment is protected by a certified professional.
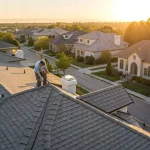
Signs It’s Time to Repair or Replace Your Roof
Your roof is your home’s first line of defense, but it doesn’t last forever. In Southern California, the constant sun exposure and occasional downpours can take a toll. Spotting trouble early can save you from the headache of interior water damage and more expensive fixes down the road. While a professional inspection is the only way to know for sure, you can keep an eye out for a few key warning signs. If you notice any of the issues below, it’s a clear signal that your roof needs attention from a professional.
Curled, Cracked, or Missing Shingles
Take a look at your roof from the street. Do the edges of your shingles look like they’re curling up, or can you see distinct cracks and splits? These are signs that the shingles are past their prime and are becoming brittle. The San Diego sun can bake the life out of asphalt, causing it to shrink and crack. You might also spot areas where shingles are completely gone, often after a windy day. Each damaged or missing shingle is a weak spot, creating an entry point for water to seep into your home’s structure. If you see widespread curling or multiple missing shingles, it’s time to schedule a professional roof inspection to assess the extent of the damage.
Granules in Your Gutters and Dark Streaks
Next time you clean your gutters, pay attention to what’s in them. If you find a lot of black, sand-like particles, those are the granules from your asphalt shingles. These granules are essential for protecting the shingle from UV rays and slowing its breakdown. When you start seeing them in your gutters, it means your roof is aging and losing its protective layer, making it vulnerable to sun damage. You may also notice dark streaks or stains on your roof. While sometimes just a cosmetic issue caused by algae, these streaks can also indicate that moisture is lingering on the surface, which isn’t great for your roof’s long-term health.
Signs of Water Damage or Blistering
Some of the most serious signs of roof failure appear inside your home. Look for water stains on your ceilings or walls, especially in the attic. Any sign of a leak means you have an active problem that needs immediate attention. On the roof itself, you might see shingles that look like they have bubbles or blisters on their surface. This happens when moisture gets trapped within the shingle, causing it to pop. A blistered shingle is a weak shingle, and it will eventually rupture, leaving your roof exposed. Don’t wait for a small stain to become a major problem; water damage can lead to mold and structural issues if left unaddressed.
Considering Your Roof’s Age
Even if your roof looks okay from the ground, its age is a major factor. A typical asphalt shingle roof lasts about 20 to 30 years. If your roof is approaching the two-decade mark, it’s smart to start planning for a replacement. You can often find the age of your roof in the paperwork from when you bought your home. An older roof is much more likely to fail during a major storm. Getting a roof certification can give you a clear picture of its remaining lifespan and help you budget for a replacement before it becomes an emergency. Proactively replacing an old roof is always less stressful than dealing with a sudden failure.
How to Prepare Your Home for a New Roof
A new roof installation is a big project, but it doesn’t have to be a disruptive one. With a bit of planning, you can make the entire process smoother for both you and the roofing crew. Taking a few simple steps before the team arrives helps protect your property, keeps the project on schedule, and ensures there are no surprises along the way. Think of it as setting the stage for a successful renovation. Your contractor will handle the heavy lifting, but your preparation is key to a seamless experience. From clearing the driveway to protecting your prized rose bushes, a little effort beforehand makes a huge difference. We’ll walk you through exactly what you need to do to get your home ready for its new roof.
Protect Your Landscaping and Property
Your home’s exterior is more than just the house itself. Before the old shingles start coming off, take a walk around your property. Move any potted plants, patio furniture, grills, and children’s toys away from the house and into a safe spot like the garage or a corner of the yard. For delicate garden beds or shrubs close to the foundation, cover them with tarps to shield them from falling debris. It’s also a good idea to trim back any tree limbs hanging over the roofline. This not only protects your trees but also gives the roofing services crew the clear, safe access they need to work efficiently.
Know the Timeline and Plan for Weather
Your roofing contractor should give you a clear timeline for the project, which for most homes is just a few days. However, Southern California weather can be unpredictable. High winds or a surprise rain shower can cause delays, as it’s unsafe to work on a roof in those conditions. Stay in touch with your project manager about the schedule and be prepared for some flexibility. A professional team will keep a close eye on the forecast and will only proceed when it’s safe to do so, ensuring the quality of the installation and the integrity of your home’s interior are never compromised. This open communication is a hallmark of a reliable company.
Your Pre-Installation Checklist
Before the crew arrives, run through this quick checklist. First, clear out your attic space, removing any fragile or valuable items that could be damaged by vibrations. It’s also smart to take down pictures or decorations from the walls on your top floor for the same reason. Next, make sure the driveway and any paths around your home are clear of vehicles so the team has space for their equipment and a dumpster. Finally, have a quick chat with your contractor to confirm they have all the necessary permits and that you both understand the plan for the day. If you have any last-minute questions, now is the perfect time to contact them.
How to Maintain Your New Asphalt Shingle Roof
Your new asphalt shingle roof is a major investment in your home’s safety and curb appeal, and you want it to last as long as possible. The good news is, keeping it in top shape isn’t as daunting as it sounds. With a little proactive care, you can extend its lifespan and prevent small issues from turning into major headaches. Think of it like regular check-ups for your car—a consistent maintenance routine helps everything run smoothly and protects your investment for years to come. A well-maintained roof not only protects your home from the elements but also contributes to its overall value and energy efficiency.
Proper roof maintenance boils down to a few key habits. It’s about being observant, keeping things clean, and knowing when to ask for help. By scheduling regular inspections, you can catch potential problems early before they cause serious damage. Understanding the importance of these checks helps you maintain the roof’s integrity and avoid costly future repairs. Clearing away debris from your roof and gutters is another simple but critical step to prevent water damage and preserve your shingles. Finally, understanding which problems you can handle and which require a professional touch will save you time, money, and stress. We’ll walk through each of these steps so you can feel confident in caring for your new roof.
Schedule Regular Inspections
One of the best things you can do for your roof is to look at it regularly. We recommend a professional roof inspection at least once a year and after any major storm. A trained expert can safely get on your roof to spot subtle signs of wear and tear that aren’t visible from the ground, like loose flashing or granule loss. These inspections help you catch potential issues early, which is key to avoiding expensive repairs down the line. Between professional visits, you can do your own visual check from the safety of the ground. Look for any cracked, curled, or missing shingles, and take note of anything that looks out of place.
Keep It Clean and Free of Debris
In Southern California, it’s common for leaves, pine needles, and small branches to collect on your roof and in your gutters. While it might seem harmless, this debris can trap moisture against your shingles, promoting the growth of algae and moss. Over time, this can degrade the shingles and shorten their lifespan. Clogged gutters are an even bigger problem. When water can’t flow freely, it can back up and seep under your roof, potentially causing leaks and water damage to your home’s foundation. Regular gutter cleaning is imperative to prevent this. Make it a habit to clear your gutters and gently sweep debris off your roof, especially in the fall. Trimming back overhanging tree branches can also make a big difference in your overall roof maintenance.
Know When to Call a Pro
While routine cleaning and visual checks are great DIY tasks, some issues require a professional’s expertise. Trying to fix a complex problem yourself can sometimes make it worse or put your safety at risk. Leaks, for example, are often a late sign of a bigger issue, and a professional can track down the true source of the water and repair it correctly. If you see water stains on your ceiling, find a significant number of shingle granules in your gutters, or notice major damage after a storm, it’s time to call for professional roofing services. A certified roofer has the right tools, materials, and safety equipment to handle the job efficiently and ensure your home is protected from future damage.
Related Articles
- Roof Replacement – Cert-A-Roof Roof Inspections
- How Long Do Asphalt Shingle Roofs Last? 4 Key Factors – Cert-A-Roof Roof Inspections
- Re-Roofing & Replacement – Cert-A-Roof Roof Inspections
- How Much Does a Full Roof Replacement Cost? A Guide – Cert-A-Roof Roof Inspections
- Re-Roofing & Replacement – Cert-A-Roof Roof Inspections
Frequently Asked Questions
How long will my new asphalt shingle roof actually last in the San Diego sun? The lifespan of your roof really depends on the type of shingle you choose and how well you maintain it. A standard three-tab shingle might last around 20 years, while a higher-quality architectural shingle can last 30 years or more. The constant sun exposure in our climate is a big factor, which is why regular inspections and keeping the roof clear of debris are so important for getting the most out of your investment.
Are “cool roof” shingles really worth the extra cost for my home? For most San Diego homeowners, the answer is a definite yes. While they have a higher upfront cost, shingles with reflective granules can significantly reduce how much heat your attic absorbs. This means your air conditioner doesn’t have to work as hard, leading to real savings on your energy bills over time. It’s a practical upgrade that makes your home more comfortable and efficient.
Can I just put a new layer of shingles over my old ones to save money? While it might seem like a tempting shortcut, we strongly advise against it. Adding a second layer puts a lot of extra weight on your home’s structure and, more importantly, it prevents a contractor from inspecting the underlying roof deck for rot or damage. A complete tear-off is the only way to ensure your new roof has a solid foundation, and most manufacturer warranties actually require it.
What’s the difference between a roof inspection and a roof certification? Think of a roof inspection as a detailed health check-up. A professional will assess the condition of your roof, identify any current problems, and recommend necessary repairs. A roof certification is a formal document that goes a step further. It’s a written guarantee, often used in real estate transactions, stating that the roof is in good condition and is expected to remain leak-free for a specific period.
How disruptive is the roof replacement process going to be for my family? A roof replacement is definitely a construction project, so you should expect some noise and activity. However, a professional crew works hard to minimize the disruption. The entire process for a typical home usually only takes a few days. The team will protect your property and landscaping, and they’ll handle all the cleanup. Good communication with your contractor will help you know exactly what to expect each day.
Comment (0)